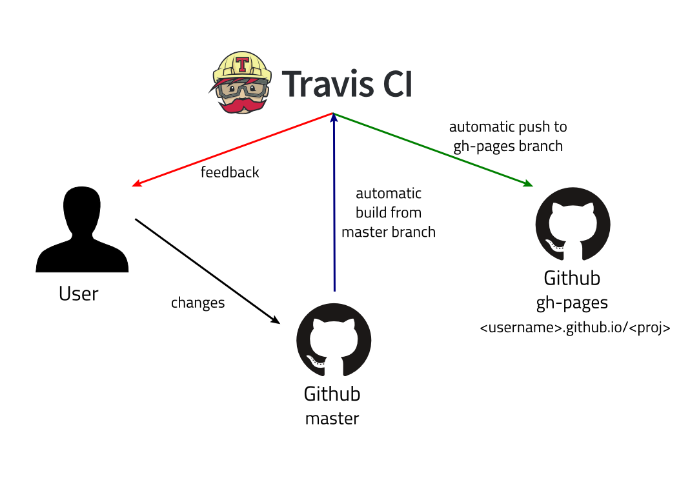
Deploy Hexo via Travis CI
I’ve used Travis CI to deploy Github Pages. It is free for open source repository, meaning your repository’s master branch has to be public. Please skip to the Private repository section if you prefer to keep the repo private, or prefer not to upload your source folder to GitHub.

Public repository
- Create a repo named username.github.io, where username is your username on GitHub. If you have already uploaded to other repo, rename the repo instead.
- Push the files of your Hexo folder to the repository. The public/ folder is not (and should not be) uploaded by default, make sure the .gitignore file contains public/ line. The folder structure should be roughly similar to this repo, without the .gitmodules file.
- Add Travis CI to your account.
- Go to Applications settings, configure Travis CI to have access to the repo.
- You’ll be redirected to Travis page.
- On a new tab, generate a new token with repo scopes. Note down the token value.
- On the Travis page, go to your repo’s setting. Under Environment Variables, put GH_TOKEN as name and paste the token onto value. Click Add to save it.
- Add .travis.yml file to your repo (alongside _config.yml & package.json) with the following content:
sudo: false
language: node_js
node_js:
    - 10 # use nodejs v10 LTS
cache: npm
branches:
    only:
    - master # build master branch only
script:
    - hexo generate # generate static files
deploy:
    provider: pages
    skip-cleanup: true
    github-token: $GH_TOKEN
    keep-history: true
    fqdn: <your-custom-domain>
    on:
    branch: master
    local-dir: public
Once Travis CI finish the deployment, the generated pages can be found in the gh-pages branch of your repository
In your GitHub repo’s setting, navigate to “GitHub Pages” section and change Source to gh-pages branch.
NOTE
If you’d like to point GitHub pages to a custom domain, follow the instructions from Github going through your repo settings. When you pass in your custom domain, GitHub creates a CNAME txt file on your repo at the root level. Ensure your CNAME on DNS records for your domain points to username.github.io.
Also ensure you provide the fqdn flag on your travis config as hexo deployer resets to default on every new run. Once the fqdn is set, this overrides the default and GitHub will keep track of your CNAME
Check the webpage at username.github.io. or your-custom-domain if you’ve configured the settings.
Project page
If you prefer to have a project page on GitHub:
Navigate to your repo on GitHub. Go to the Settings tab. Change the Repository name so your blog is available at username.github.io/repository, repository can be any name, like blog or hexo.
Edit your _config.yml, change the root: value to the /
Commit and push.
Private repository
The following instruction is adapted from one-command deployment page.
Install hexo-deployer-git.
Add the following configurations to _config.yml. This configures the branch to deploy public static files. You can configure any branch or use default gh-pages branch
deploy:
    type: git
    repo: https://github.com/<username>/<project>
    # example, https://github.com/hexojs/hexojs.github.io
    branch: gh-pages
Run the following
hexo clean && hexo deploy.
Check the webpage at username.github.io.