Getting handy with Git
In my early years, as a developer, it was imperative that we had to follow a code review process to ensure the code has minimum quality standard. Git was huge life saver when it came to code assurance and integrity. So let’s dive in
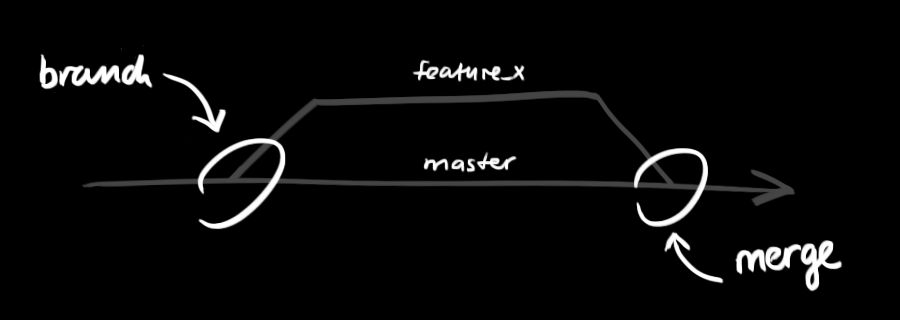
Working on Branches
Git allows you to work on branches. According to the git documentation:
Branching means you diverge from the main line of development and continue to do work without messing with the master line. Branches enables for faster development as it allows parallel development
To create a new branch, you just need to use the git checkout -b <branch_name> command:
$ (master) git checkout -b awesome_branch
> Switched to a new branch 'awesome_branch'
Once in a new branch, the workflow is the same. Create commits for your changes and push them to your repo (but not to master). This can vary if you have setup policies on master for code reviews before merging to master
[...] some commits [...]
$ (awesome_branch) git push origin awesome_branch
This command pushes the changes to the new branch. If you want your work to be uploaded to a different branch on your remote (other than awesome_branch), just use the command like this:
$ (my_new_branch) git push origin awesome_branch:awesome_branch_on_remote
Ok, back on track. Now to move back to your master branch (or any other branch), you just need to use the git checkout command without the -b param:
$ (my_new_branch) git checkout master
> Switched to branch ‘master’
$ (master) git checkout my_new_branch
> Switched to branch ‘my_new_branch’
You can have more than one person working on the same branch as you, but that’s not recommended. With one person per branch everyone can make their mess without worrying about disturbing someone else’s work.
Update & Merge
Update your local repository to the newest commit, execute git pull in your working directory to fetch and merge remote changes.
To merge another branch into your active branch (e.g. master), use
git merge <branch>
in both cases git tries to auto-merge changes. Unfortunately, this is not always possible and results in conflicts. You are responsible to merge those conflicts manually by editing the files shown by git. After changing, you need to mark them as merged with
git add <filename>
before merging changes, you can also preview them by using
git diff <source_branch> <target_branch>
Code review
Instead of merging your branch back to master right away, a good practice of software development is to request your new code to be reviewed by other team members before.This tends to increase the code quality of your app, since more people will take a look at it, spotting improvements and even small bugs before it reaches production.
For me personally, this was an awesome way to learn new stuff from more experienced developers.
Pull Requests
A pull request (or a merge request, if you use GitLab) can be defined as:
Pull requests let you tell others about changes you’ve pushed to a repository. Once a pull request is sent, assigned developers can review the set of changes, discuss potential modifications, and even push follow-up commits if necessary.
source.
Even after opening a pull request, you’re still able to push new commits to your branch. You can use that to get early reviews of your code and keep working on some other part while people review what you’ve already uploaded.
Tip: Remember to review your own pull request before asking for reviews of your teammates. You’ll spot a lot of small things you didn’t notice (style issues, typos, etc) and will allow your developers to focus on what really matters.
Refactoring Code
If your team asks for reasonable changes in your code, you’ll have to do it (for the sake of code quality). Let’s take a look on a scenario that happens almost all the time: adding new changes to a previous commit.
So, this is your file_1.awesome (yeah, the typo is on purpose :P)
[...]
some_awesome_function
some_more_awesome_function
[...]
And this is your commit history (older commits on top):
d5g3f6d create file_1 class and methods
674154e improve SomeOtherAwesomeClass code
h9k4a0d update changelog
Someone points out that your some_more_awesome_function has a typo on its name and now you have to fix it. You update the file and commit the fix. And now here’s your new commit history:
d5g3f6d create file_1 class and methods
674154e improve SomeOtherAwesomeClass code
h9k4a0d update changelog
fd45dbb fix typo on file_1
But hey, you’re fixing something that you just added on this pull-request (on the first commit, to be exact) It would be nicer to have both the creation and the fix of file_1 on only one commit, right?
Git is such a wonderful tool and has this killer command that allows us to change previously stablished commits: git interactive rebase.
So we need to merge the first commit (d5g3f6d with the last one fd45dbb). And that’s when the interactive rebase tools comes in hand.
$ (some_branch) git rebase -i origin/master
The origin/master param is our start point. This basically is telling git: “hey, we want to change the history since the last commit origin/master”, otherwise known as your branch!
You can also use HEAD~4 as a param, which works like: “hey, we want to change the history since 4 commits behind the current one”. The official docs has more details on this.
After executing the command, this will be your screen:
  pick d5g3f6d create file_1 class and methods
  pick 674154e improve SomeOtherAwesomeClass code
  pick h9k4a0d update changelog
  pick fd45dbb fix typo on file_1
  # Rebase 710f0f8..fd45dbb onto 710f0f8
  #
  # Commands:
  #  p, pick = use commit
  #  r, reword = use commit, but edit the commit message
  #  e, edit = use commit, but stop for amending
  #  s, squash = use commit, but meld into previous commit
  #  f, fixup = like "squash", but discard this commit's log message
  #  x, exec = run command (the rest of the line) using shell
  #
  # These lines can be re-ordered; they are executed from top to bottom.
  #
  # If you remove a line here THAT COMMIT WILL BE LOST.
  #
  # However, if you remove everything, the rebase will be aborted.
  #
  # Note that empty commits are commented out
Now we just need to follow the instructions written there! We want to combine commits f7f3f6d and a412dbb. So we must reorder the lines to be like this:
pick d5g3f6d create file_1 class and methods
pick fd45dbb fix typo on file_1
pick 674154e improve SomeOtherAwesomeClass code
pick h9k4a0d update changelog
And we change the pick label on the fd45dbb commit to a fixup (or f), to tell git: “hey, we want to combine this commit with the one above”:
pick d5g3f6d create file_1 class and methods
fixup fd45dbb fix typo on file_1
pick 674154e improve SomeOtherAwesomeClass code
pick h9k4a0d update changelog
Save your file and bang! Here’s your new commit history:
g6j3f33 create file_1 class and methods
ee74ae9 improve SomeOtherAwesomeClass code
jk9fad3 updates changelog
However there’s a catch here, the hash of all commits changed due the rewrite of the history.
If you already pushed your branch to remote, remember to use -f next time you push, since you’ve rewritten the your commit history
$ (some_branch) git push -f origin some_branch
Warning: pushing with
-fis very dangerous. Proceed with caution and always be sure that you’re pushing to the right branch.
Pro Tip: NEVER rewrite the commit history of public branches (like master). This will truly mess your developers work.
Tagging
it’s recommended to create tags for software releases. this is a known concept, which also exists in SVN. You can create a new tag named 1.0.0 by the following command
git tag 1.0.0 1deg6j63ff
the 1deg6j63ff stands for the first 10 characters of the commit id you want to reference with your tag. You can get the commit id by looking at the logs.
Logs
In its simplest form, you can study repository history using the command git log
You can add a lot of parameters to make the log look like what you want. To see only the commits of a certain author:
git log --author=arvind
Merge Requests
Teams usually establish a minimum amount of reviews to get a pull request merged. Once you get the enough numbers of eyes on your code, designate someone to merge it or you can also merge yourself.
And that’s it! Your code is now on your master branch, ready for test and ship to production.
This workflow followed by thousands of software developers around the world! You prevent people from stepping on each others toes while working and ensure that the code that goes to production has been approved by a minimum number of developers.
Fun stuff
- Built-in git GUI:
gitk - Use colorful git output:
git config color.ui true - Show log on just one line per commit:
git config format.pretty oneline - Use interactive adding:
git add -i